Why Should You Listen To Me?
Why should you listen to me when it comes to how to install vinyl skirting on a mobile home? This is one of the core activities that my company carries out on a daily basis. Skirting has been installed by us for hundreds of homeowners each year. I personally still skirt houses to this day and I still take pride in the way my work looks and how vinyl skirting raises the value of a mobile home.
Before I get to the full DIY guide, I have included some essential information about skirting for the reader. If you already know all about skirting and just want to see the full installation instructions.
An Introduction To Skirting?
Skirting or underpinning as it is sometimes called, is a covering apron installed around the base of a mobile home. The materials used can vary from simple chicken wire to solid block cemented to a strip footer. The cost of skirting can vary considerably from a few dollars to several thousand depending on the materials used.
Skirting is not usually structural in nature, it covers up the underside of the home and gives a finished look to the project. The skirting rests on the ground at the bottom and is fixed to the mobile home wall at the top.
Skirting is often required in mobile home parks or as a part of the permit process for city and county building departments.
Why Do Mobile Homes Need Skirting?
Aesthetics – The underside of mobile homes with all of the piers and pipes can be an eyesore.
Animals and pests – Skirting provides some protection against dogs, cats, etc. which can dig up your foundation if it is left open and easily accessible.
Building Regulation or Home Owner Associations (HOA’s) – Permits usually require the underside of the home to be skirted before issuing final certificates. Sometimes lack of skirting is a building code violation.
Why Should I Use Vertical Vinyl Skirting On My Mobile Home?
Vinyl skirting is much cheaper and easier to install than other types of skirting. Unlike white lattice, chicken wire, plywood and corrugated metal it is made specifically for this one job only. Homes skirted with white vinyl look very clean and finished. When installed correctly it adds value to your home.
Vertical Vinyl skirting is very modular in nature and can be removed with the home to be used again. The panel is easily removed for easy storage use and to gain access to the plumbing and wiring underneath the home. The panels are very lightweight and easy for all homeowners to manage.
Repairs to vinyl siding are cheap and simple.
Should I Use Skirting Color Other Than White?
My personal opinion is no for a couple of very good reasons that I will expand upon below:
White skirting just looks better, it is usually a contrast to the colour of the vinyl siding on the main part of the home. White is readily available at short notice from local suppliers.
Some people choose matching colours which tend to be in special order. These colours may become obsolete and unavailable for future repairs or additions to the home.
One complete color from the roofline to the ground matches, but in my opinion, does not look visually balanced.
What Tools Do I Need To Install Vinyl Skirting?
Most of these tools are cheap and many homeowners will already have them in their DIY tool kit. They are all readily available at Lowes, Home Depot, Harbor Freight and Ace Hardware stores.
- Tape measure.
- Garden rake.
- Small Torpedo Level.
- 4 Foot Level.
- Pencil.
- String line and stakes.
- 1/4″ Nut Driver.
- Battery Impact/Drill.
- Pair of sharp Snips.
- Set square/speed square.
- Skill saw with a fine blade (optional.)
Having these tools will make the job go a lot smoother and most of them are useful to have around on a long term basis.
What Materials Do I Need?
Skirting supplies are readily available at Mobile Home Depot, the above retailers or online stores like amazon.
- Boxes of vertical panels.
- Box of Trim kit (Long spikes & screws)
- Hardware kit.
- Extra 1/4″ Hex screws.
No other materials are needed for a regular installation.
How Do You Measure Skirting For A Mobile Home?
So how much material will you need to buy to complete this project? With a little simple math and the calculator app on a cell phone, it is fairly easy to make a close estimate of the number of panels and trim kits that are required
To get a rough idea of the amount of material needed measure the following:
- Total length of all sides of the home.
- Average height from the ground to 4″ above the bottom of the wall.
To get the average height, measure at various locations, add the measurements together and divide by the number of locations.
2 x ( length + width ) x ( average height ) = square feet
Example.
A 28’x48′ doublewide home with an average height of 32″ or 2.5 ft.
2 x (48 + 28) x (2.5) =
152 x 2.5 = 380 sq.ft.
For The Number Of Panels.
Each 16″ x 12′ skirting panel = 16 sq.ft.
Number of panels needed 380/16 = 23
For The Number of Trim Pieces:
Each trim piece is 12 ft in length.
Number of trim pieces = 152/12 = 13
A minimum of 23 panels + 13 lengths of trim are needed.
Note: Buy some extra in case of mistakes, you can always use the leftover pieces for repairs.
How Long Does It Take To Put Skirting On A Mobile Home?
If you need the job doing correctly 1st time it will take one skilled man one day. Two skilled men should take around 4-5 hours.
However, if you are doing it yourself for the first time, it may take three days to complete the project to your satisfaction. But that is ok. I remember the first skirting job that I did 24 years ago. It didn’t go as fast as I had expected, to say the least.
How To Install Vertical Vinyl Skirting – Full Instructions.
Below I have given detailed steps to complete the project yourself. Work through each step and take your time, for a great result.
Install the Top BackTrack First.
Install the top track first before you prepare the ground around the home. This will save doing the ground twice.
The top track is installed over the top of the bottom row of the lap siding. Do not remove any lap or starter strip from the home.
Secure the top track with 1″x ¼” screws or galvanized roofing nails at 16″ on center. Do not tighten fastenings too much, back off the screws 1/2 a turn to allow the track to hang loosely. Leave a minimum ⅛” gap between the butted ends to allow for heat expansion.
Hide all of the cut ends of the track behind the vinyl siding corner posts.

Prepare The Ground Around Your Home.
Rake and level a 12″ wide strip of ground around your home where the bottom track will sit.
Use additional soil or fill dirt if needed.
This strip of ground needs to be flat and free of rocks and vegetation.
The bottom track needs to lie fairly flat, it doesn’t have to be perfect but you don’t want to look at the side of your house and see up-and-down variations.
Install The Bottom Track Next.
The correct alignment of the bottom track will make the difference between a professional-looking job and a shoddy end result.
Take your time with this section.
Using the 4ft level, mark the ground vertically aligned with the face of the top track to the back lip of the bottom track.
Mark this position at both ends of each side and each end of the home. Connect these locations with the string lines to points outside the footprint of the home as in the illustration below.
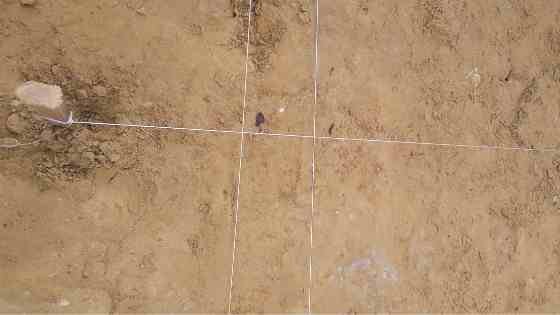
Start by cutting a miter into 4 pieces of the track at least 3 feet from one end. Cut the miters as shown below, the front face will be exposed to view. Bend the miters to 90 degrees and line up the track with the string line. The raised back lip of the track lines up with the string line to make a sharp rectangle.
[Img]
Install the corner pieces of the bottom track first and then fill in the gaps with long sections of the track. Push the 8″ spikes all of the way through the track and into the ground. The spike head needs to be flush with the bottom of the vinyl track.
Tip: Get the corners perfectly square and plumb before moving on to install the sides, this is very important.
Cut and Install The Vertical Panels.
Start at the air conditioner cabinet or any area where a joint line in the siding will not be obvious. Cut each piece to length either individually or take all measurements around the home and cut in similar size batches.
The top of the panel should be cut 1″ lower than the top trim slot to allow room for the top front trim to be easily inserted.
Hide one edge of the first panel behind the edge of the ac unit. Plumb the panel with the torpedo level before securing at the top and bottom with screws.
Cut, level and secure each panel as you work your way around the home.
Tip: Do not screw in the last 2 panels before each corner just yet!
Carefully Bend and Install the Corner Panels.
Cut slots for the panel behind the corner post on all four corners.
Each panel has a bend or ribs every 3 inches or so for extra strength. Try to make one of these bend lines coincide with the corner bend. Bend the panel along one of the lines carefully. If necessary warm the panel fold with a heat gun or a hair drier. It helps to form the corners over a square corner like a 2″x4″, for instance.
Take out the previous 2 panels before carefully sliding the corner panel behind the corner post and seating it in the bottom track.
Now replace the other 2 panels and secure them all at once, adjusting to ensure a square, true corner. Install and secure all of the remaining panels around to the other side of the air conditioner.
Fill in the space above the a/c as needed securing to the top track where possible.
Insert The Top Front Track.
Starting from a corner, slide in the top track around the home. Line up the overlapping joints so that they do not show as people approach the home.
The front top track is installed by pushing its top edge into the corresponding slot in the back track. Sometimes it will need a sharp upwards slap with the heel of your hand.
Hide all of the final cut ends behind a corner trim piece.
Finally – Finishing Touches.
Clean up any dirt or handprints with a clean rag, soap and water.
Dispose of all plastic offcuts and cardboard boxes.
Put any spare panels and trim behind the skirting to repair any future damaged parts.
Does Mobile Home Skirting Need To Be Vented?
Yes, the space under the mobile home should be vented at the rate of 1 sqft of vent for each 200 sqft of floor space. Vinyl skirting comes vented from most good suppliers, ask for it when you order the panels. Proper venting allows air to circulate under the home preventing damp and moldy conditions.
The state of Florida mandates the requirements below and even in other states these rules would be ideal for most mobile homes to prevent mold and mildew from developing.
Unless the skirting has integral ventilation openings that meet the following ventilation requirements, install equally sized ventilation openings on at least two opposite sides of the foundation. Size ventilation area to equal at least one square foot for each 150 square feet of under-floor area when no vapor barrier is used. The recommended ventilation for homes with vapor barriers is one square foot for each 300 square feet of under-floor area. Place vents as high above the ground as practical.
source: dhsmv
If any moisture does get underneath the skirting, the added airflow will speed up the drying process, protecting your home. The infiltration of damp air and the subsequent development of mold is one of the biggest problems for mobile homes.
Plastic vents can also be added instead as required but in my opinion, they do not look as good as the ready vented panels.
How Much Does It Cost To Install Vinyl Skirting?
In the example of a 28′ x 48′ doublewide above, 380 sqft skirting job complete:
- Material cost will be 380 sqft @ $1.50 per sqft, around $570
- Labor at the day rate for your particular area probably $200 -$300
- If you have the materials delivered perhaps an extra $75 – $100
Total cost for materials, labor & delivery between $845 – $970.
If you are doing the work yourself and delivering your own materials $570-$650.
Landscaping Trick To Protect Your Vinyl Skirting.
We have all seen skirting around mobile homes with holes and crack dotted around the bottom of the panels. It looks terrible and it is a free entry for pests. These holes are caused by weed whacker nylon strings striking the vinyl and stones thrown up by lawnmower blades.
To prevent this you need to set up an area around the base of the skirting in which grass does not grow. If the grass doesn’t grow next to the home there will be no need to trim the edges. This is best achieved by surrounding the skirting with around 18 inches of mulch. This will form a protective barrier between the grass and the skirting where nothing organic will spout up.
You can also take the time to plant shrubs and flowers in this area to enhance the effect.
Also Read: How to Repair a Mobile Home Floor.